Monday, November 19, 2012

When a Brazilian is a Good Thing

Mention the word "Brazilian" to most women and they'll probably head for the hills.  I'm guessing it's similar to showing a man a bag of frozen peas.

Recently I discovered a very lovely something that, while associated with the word, will have you going back for more.

Brazilian Shrimp Soup is a dish I stumbled upon while doing some mindless web browsing and I do apologize to whomever I took this from since I didn't not catch your name to give you proper credit.  But it was late and I was in some sort of carbohydrate coma, I'm sure.

So, thank you, whoever you are, for passing down this very lovely, hearty, simple soup to warm a Wisconsinite on a cold (nearly) winter's night.


  Here are the ingredients you'll need (full recipe to follow).  I had to make a slight adjustment to this recipe because I didn't have the can of crushed tomatoes.  I substituted tomato sauce and diced tomatoes. 
 It was still delicious and I'm sure that the original recipe is even better.


 There's always a little prep with a good soup.  
This doesn't have a lot, so you'll be closing down the chopshop early.


 I have a lot of kitchen gadgets.  It might even be suggested that I'm a gadget junkie (though I'll probably deny it most days).   You can squeeze the lemon into your hands and catch the seeds if you like, but don't come squawking to me when the juice hits that little cut you didn't even know you had.  This little baby, not only reams the lemon but catches the seeds.  Isn't that nice?


 Heat oil and saute the onion, pepper and garlic till they begin to soften....


 Add the rice, red pepper flakes, salt, tomatoes and water and bring to a boil.  
Cook till the rice is nearly tender.


Chop the shrimp in half.  I only had ready-to-eat because it was on sale. Yeah, shrimp sale!


Add the coconut milk and bring it back to a simmer.  Then add the shrimp.  They're already cooked, so you're really just heating them through (unless you're using them raw in which case you'll cook till they turn pink).  Stir in the lemon juice, pepper, and parsley (fresh is best, but dried will do in a pinch).

And BAM!  Just like that you've got a Brazilian that you can shake a razor at!  (I know, bad pun...boo!)


Sometimes making a "cold call" to a recipe is really hit or miss.  I was pleasantly surprised to find everyone (including myself!) going back for seconds of this hearty soup.  Hope you'll try it!


Brazilian Shrimp Soup 

2 tablespoons cooking oil
1 onion, chopped
1 green bell pepper, chopped
3 cloves garlic, minced
3/4 cup long-grain rice
1/4 teaspoon red-pepper flakes
1 3/4 teaspoons salt
1 3/4 cups canned crushed tomatoes in thick puree (from one 15-ounce can)
5 cups water
1 cup canned unsweetened coconut milk
1 1/2 pounds medium shrimp, shelled and cut in half horizontally
1/4 teaspoon fresh-ground black pepper
1 tablespoon lemon juice
1/2 cup chopped fresh parsley or cilantro
  1. In a large pot, heat the oil over moderately low heat. Add the onion, bell pepper, and garlic and cook, stirring occasionally, until the vegetables start to soften, about 10 minutes.
  2. Add the rice, red-pepper flakes, salt, tomatoes, and water to the pot. Bring to a boil and cook until the rice is almost tender, about 10 minutes.
  3. Stir the coconut milk into the soup. Bring back to a simmer and then stir in the shrimp. Simmer, stirring occasionally, until the shrimp are just done, 3 to 5 minutes. Stir in the black pepper, lemon juice, and parsley.
Notes Variation Instead of the shrimp, use one pound of boneless, skinless chicken breasts (about three), cut crosswise into quarter-inch strips. Cook for the same amount of time.


Wednesday, November 14, 2012

Cashew Brittle - Hey, it has redeeming qualities!

I love cashews.  Who doesn't?  Well, I'm sure someone out there doesn't - probably the same person that doesn't like watermelon.  

Anyway - many moons ago when I worked at a county park, someone brought in Amish Cashew Brittle.  I capitalize the name because it deserves a little respect!  It is so simple, but so delectable!  It melts in your mouth and is buttery and crunchy and well, hey, it's Amish, of course it's going to be good.  I don't know how they know how to bake so well.  Just another one of life's mysteries.  

The neat thing about this story is that there exists a place in this Amish land, apparently near Cashton, WI, that is akin to a general store.  It is referred to the non-amish as "The Amish Walmart".  Now,  I don't know if they appreciate that sentiment - I'm sure it's not meant with any hidden meanings - but so it is called and probably forever more will be.  

Perhaps the Amish Five and Dime or the Amish Woolworth's would have been a better choice?

Fast forward out many moons, and one day I am in the Mousehouse Cheesehaus in Windsor.  All kinds of neat cheeses, fudge, souvenirs, and microbrews that have fun and interesting names like, "Kiss the Lips", and "Bitter Woman".  Which you can find the story of here.  Off into the distance there is a blinding light beckoning me come...come...come to me.  I am drawn to a little shelf, kind of hidden from view, kind of like someone set up a "Stacey" shelf just for me.  There they were.  Lots of little clear plastic boxes filled with all that Amish love and buttery cashew brittle naughtiness.  I was weak.  I bought it.  I ate it.  All!

Okay...I embellished a little for dramatic effect.  But this stuff is that good. It's worth a little drama.  Here's the thing.  This stuff is not only great but a little box is also really expensive.  Which is probably a good thing.  I often need something to intervene to save me from myself.

Don't we all?

But it occurred to me...I don't want to have pay out the nose for a sweet little sin like that.  It felt like a challenge to me.  I must go home.  I must find a really close recipe and indulge my addiction.  I could channel my inner Amish and whip something up...right?

So...here we go.  You almost need more tools for this stuff as you do ingredients.  You'll find the recipe below.  I know, candy-making is intimidating.  I've been there.  You'll make mistakes (Lord knows I had to throw my share of money away).  As Julia says...never apologize!


 Besides the cashews, you'll need some butter, corn syrup, baking soda, sugar, water.


 You'll also want to consider buying a silpat mat.  It is indispensable for so many things.  Hit your local Bed, Bath, and Beyond, pull out one of the hundred coupons you've been saving and get one - and buy one for a friend - just use 2 coupons.

Now, put on a little Etta James..."Trust in Me" and launch your candy-making debut.  No fear!


 In a saucepot, combine butter, sugar, water and corn syrup.  Bring it to a boil.
 It has to get happy to pass any happy along to you!


While you're at Bed Bath and Beyond, save another coupon for a decent candy thermometer.  It's holiday time...you're gonna need it anyway, right?


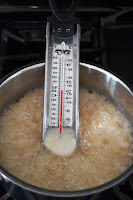
Patience, young padawan!  This takes a little time.  But use your Jedi senses to know when to pull it!  It's like the gas tank, after half a tank it's all downhill and fast!  So watch carefully and don't let it burn.

Let it bubble, bubble to its happy stage, 300 degrees.  Pull it off the heat and add the baking soda.  It's going to get even happier, so be careful.  It'll bubble up.

Here's where I changed the recipe.  It asked me to add my cashews after the baking soda.  Sounds good, but the moment that stuff starts cooling, you can hardly stir it.  It's like a 10-year old, it just can't wait to grow up and be a big brittle!  So, my adjustment was to sprinkle my cashews on the silpat mat and then pour the caramel over it.  The more packed your cashews, I find, the easier it is to eat.  Meaning...it won't be so fast to pull out the dentistry you just had!

Pour out the caramel onto the cashews and and allow it to cool and harden completely.  Then just break it and pat yourself on the back.  No wait...eat it and then pat yourself on the back.


OOOH....makes me want to make it again.  Right now.   Anyone would cover you in kisses for making this for them. 

If you need to be selfish, I understand.  To alleviate your guilt for eating it all and not sharing, check out this "healthy benefits of cashews" here.

If you need me to save you from yourself, you can read the dangers of high cholesterol here.

ENJOY!


Cashew Brittle

2 cups sugar
1/2 cup water
1 stick unsalted butter
1/3 cup light corn syrup
1/2 teaspoon baking soda
12 ounces cashews

Sprinkle cashews all over a silpat mat placed in a jellyroll pan with a rimmed edge.

In a large saucepan, combine the sugar, water, butter and corn syrup and bring to a boil. Cook over moderately high heat, stirring occasionally, until the caramel is light brown and registers 300° on a candy thermometer, 10 minutes.  

Remove from the heat and carefully stir in the baking soda. Careful, the mixture will bubble.

Immediately pour the brittle all over the cashews. WORK FAST!  Using the back of a large spoon (oil it lightly if it sticks), spread the brittle into a thin, even layer.  It will begin to cool quickly!!

 Let cool completely, about 30 minutes. Break the brittle into large shards.

The brittle can be stored in an airtight container at room temperature for up to 1 month.  
Tip:  Try this with other nuts, such as almonds, pistachios.


Tuesday, November 6, 2012

Pear Torte with Bonus Feature!

A few weeks back, someone had left some homegrown pears on the giving table at church.

Mmmmm, what could I do with some delicious pears?   

Not that I don't love a good salad with pears and walnuts and blue cheese, but I guess I must have been in a baking mood.  

Oh, right...when am I not in a baking mood?


This is one of those oh-so-simple recipes that taste oh-so-good and is oh-so-worth the time and little trouble it takes to make it.

You'll need some pears, vanilla, cream cheese, sugar, egg, butter, flour, nuts (optional), cinnamon.


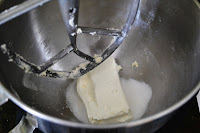
Cream butter and sugar together.  Add flour and mix till nice and crumbly.

You are essentially making a nice giant sugar cookie!
 Press the dough down into a springform pan.  This is the base of your torte.


Now make the cheesecake mixture.  Cream cheese, sugar, egg, and vanilla.

Easy-peasy-lemon-squeezy, right?


Pour the cream cheese mixture onto your giant cookie!


 Toss your beautiful and beautifully sliced pears with a little sugar and cinnamon....


This is a nut mill.  It is amazingly effective for just this sort of occasion.


Run a few walnuts through the nut mill...


 Arrange pear slices in a nice circular design.  Don't overdo it - which is easy to do.  You think, the more the better right?  But not so here because too much liquid will ruin your torte. 

If you have leftover pears/juice I have just the thing.  The bonus feature is coming up!


Sprinkle your perfectly-milled walnuts over the pears and bake.


Whoa!  That looks pretty darn good, doesn't it?  Believe me, it was. 

Okay...your turn!


Pear Torte


1/2  cup butter or margarine, softened
1/3  cup sugar
1  cup flour

1  pkg. (8 oz.) Cream Cheese, softened
1/3 cup sugar
1 egg
1/2  tsp. vanilla

1 T sugar
1/2  tsp.ground cinnamon
4  fresh pears (1-1/4 lb.), peeled, sliced
¼ cup walnuts, chopped (you can use more if you like)

 Heat oven to 425 degrees F.

Beat butter and 1/3 cup sugar in small bowl with mixer until light and fluffy. Add flour; mix well. Press onto bottom and 1 inch up side of 9-inch springform pan.

Beat cream cheese and 1/3 cup of the remaining sugar in same bowl with mixer until well blended. Add egg and vanilla; mix well. Spread onto bottom of crust.

Mix remaining sugar and cinnamon. Add to pears in large bowl; toss to coat. Arrange over cream cheese layer; top with nuts. Bake 10 minutes.

Reduce temperature to 375 degrees F; bake torte 25 minutes or until center is set. Cool completely. Run knife around rim of pan to loosen torte. Remove rim. Refrigerate torte 3 hours.


BONUS FEATURE! 

You just might have some of those sweet and cinnamon-coated pears and the juice leftover...what to do?    Do you have some yogurt?  

Or better yet, a little vanilla ice cream?  Feel free to heat the pears before you pour them over the ice cream!